 Pink Jelly Cakes
 Rich Chocolate Cake
Recipes
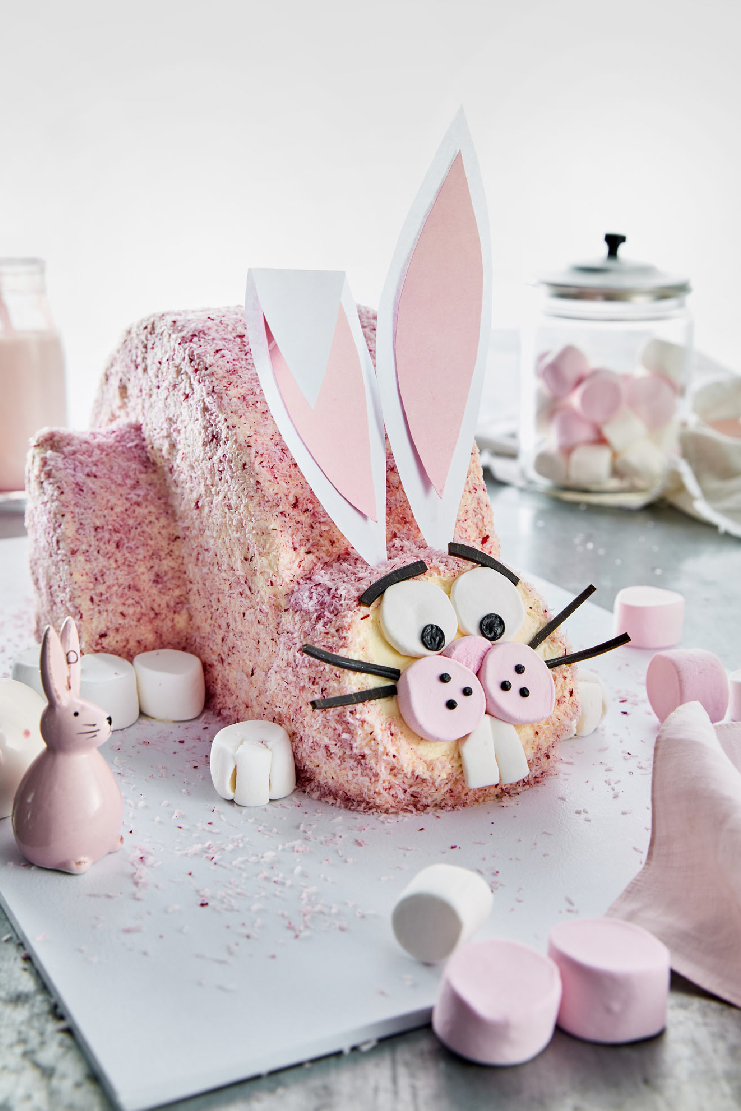
Easter Bunny Cake
Looking for an impressive Easter treat that the kids will enjoy to help make? This easy video provides step by step instructions to help you create the perfect bunny cake that is sure to impress everyone!

90 mins prep, plus cooling time
35 mins
cooking time
cooking time
Serves 15-20
Ingredients
Vanilla Cakes
- 1 x 250g block Fairy margarine, room temperature and diced
- 1 ½ cups (330g) caster sugar
- 3 tsp vanilla extract
- 4 eggs, room temperature
- 1 cup (250ml) milk
- 2 ⅔ cups (400g) self-raising flour, sifted
Fairy Cream Icing (Makes approx. 4 cups)
- 1 x 250g block Fairy margarine, room temperature and diced
- 2 ½ cups (400g) soft icing sugar mixture, sifted
- 3 tsp vanilla extract
- 100ml chilled pure cream
Pink Coconut Coating
- 1¼ cups (100g) desiccated coconut, plus extra for bunny tail
- Few drops pink food colouring
Decorations
- Pink and white marshmallows
- Black writing icing
- Licorice strap
- White and pink paper or cardboard
- Long bamboo skewers
- Sticky tape
Equipment
- 1 x 14 inch (35cm) rectangular cake board or large platter
Method
Vanilla Cakes
- Preheat oven 180°C/160°C (fan forced). Grease and line 2 x 20cm round cake tins.
- Beat Fairy margarine, sugar and vanilla in a stand mixer fitted with a paddle attachment until light and fluffy. Add eggs one at a time, beat until combined.
- Add milk and flour in two batches. Beat on low speed until just combined. Divide into prepared pans and smooth.
- Bake 30-35 minutes, or until a skewer comes out clean. Stand for 10 minutes. Turn out cakes onto a wire rack and cool completely.
Fairy Cream Icing
- Place Fairy margarine into the bowl of a stand mixer fitted with a paddle attachment. Beat on medium-high until smooth.
- Reduce speed to low. Add icing sugar gradually, until well mixed. Increase speed to high and beat for 6 minutes.
- Reduce speed to low. Add cream in a steady stream until just incorporated.
- Beat on medium-high speed for 2 minutes. Set aside.
Coconut Coating
- Place coconut inside large zip-lock bag.
- Add a few drops of pink food colouring and massage until evenly coloured. Set aside.
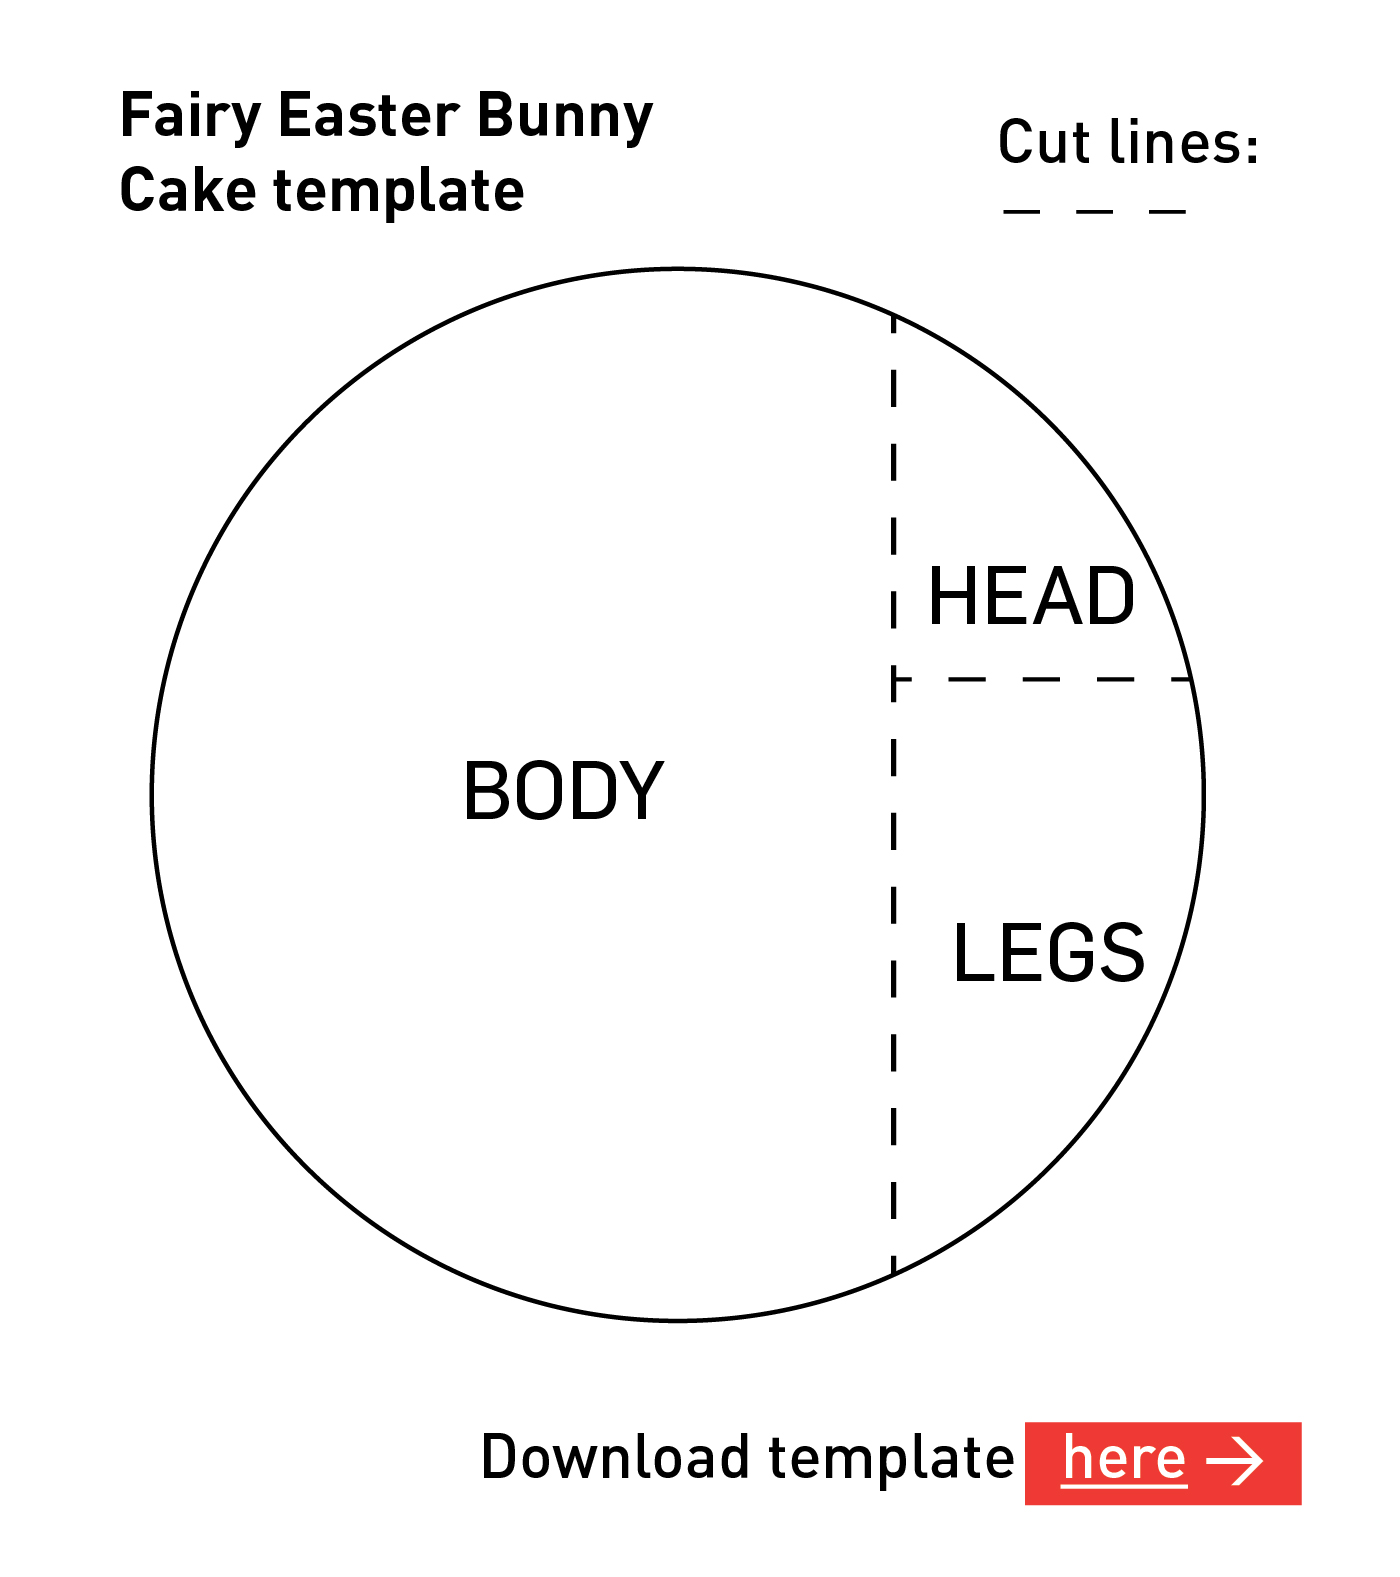
Creating the bunny body – refer to template
- Trim the crust from the top of each cake. Reserve cake scraps.
- Spread 1¼ cups of the Fairy Cream Icing on the top of one cake. Place second cake on top, cut side down. Refrigerate for 15 minutes.
- To cut the cake, print out the supplied cake template. Otherwise, slice the cake approximately ⅔ of the way across. The larger portion will form the ‘body’.
- Take the smaller portion and cut across lengthways ⅔ of the way down. The smaller portion will be the ‘head’, and the larger portion will be the ‘legs’.
Building the bunny
- Smear a layer of icing on your cake board, where the bunny will be placed.
- Place the body in the centre of the board, cut edge down.
- Press the longest edge of the head against one end of the body.
- Divide the leg portion into two, by cutting through the icing with a knife. Position each half on either side of the body, curved side facing towards the head.
- If desired, trim the top and side edges of the head and legs, to create a nice curved edge.
- Spread ½ cup of icing over the cake in a very thin layer to make a crumb coat. Refrigerate cake for 10 minutes.
- Reserve 2 tablespoons of icing for the tail and decorations, then spread remaining icing evenly over the whole bunny.
Bunny tail
- Crumble reserved cake scraps and measure ½ cup into a bowl. Mix together with 1 tablespoon of icing. Roll enough mixture to form a 5cm ball.
- Cover with a thin layer of icing and coat in plain desiccated coconut. Refrigerate until needed.
Decorate Bunny
- Press the pink coconut over the entire body, excluding the face.
- To make the face, paws and ears:
- Eyes: cut both ends off a white marshmallow and draw pupils with black writing icing.
- Cheeks: cut a pink marshmallow in half. Draw 3 dots on each half with black writing icing.
- Nose: cut a pink marshmallow in half. Cut one half into quarters. Use one piece as the nose.
- Teeth: cut the ends off a white marshmallow, then trim to make two 2cm rectangles.
- Whiskers & Eyebrows: Cut 5cm of licorice strap. Slice into five thin strips. Use four strips for the whiskers. Cut remaining strips into two 2cm pieces for the eyebrows.
- Bunny ears: cut 2 large ear shapes from white cardboard and 2 smaller ear shapes from pink cardboard. Tape one white and one pink ear shape together and tape a skewer to the back. Repeat for second ear.
- Back paws: Place 3 white marshmallows around the front of each leg.
- Front paws: cut 2 vertical slits into 2 white marshmallows. Place one front paw on either side of the head.
- Dab a small amount of icing on the bunny tail and position on the back of the bunny.
Tips:
- For best results, make the vanilla cake the day before. Wrap well in cling film and refrigerate for up to 2 days.
- Un-iced cakes may be frozen. Double wrap in cling film and freeze for up to one month.
- Always work with a cold cake.
- Chill cake between stages for at least 10 mins.
- A ‘crumb’ coat is a thin layer of icing applied to seal the crumbs into the cake layers before adding the final layer of icing.
- Use UHT cream instead of fresh cream to extend the life of the Fairy cream icing.
- For best results, Fairy cream icing should be applied at room temperature.
- Use remaining icing to attach your decorations.
- Store decorated cake uncovered in the refrigerator for up to 2 days.
Get into the spirit with more seasonal treats from our Easter collection. Pair this cake with a batch of biscuits from our Biscuits collection or a fruity dessert from our Sweet Pies and Tarts
For more recipes see our recipe books
'